Ho cominciato a programmare circa dieci anni fa, in terza superiore, e da allora qualche giovedì sicuramente è passato.
In questi anni ho sperimentato diversi linguaggi di programmazione: alcuni li ho odiati con ogni fibra del mio corpo, altri sono diventati gli strumenti con cui oggi porto a casa la pagnotta. Tra tutti, però, il linguaggio con cui ho avuto il rapporto più intenso — un misto di amore e odio — è stato Python.
Python è stato il terzo linguaggio che ho imparato a scuola, dopo C e Shell Script. All’inizio è stato fondamentale per approfondire il mondo della programmazione, in particolare quello della programmazione orientata agli oggetti (OOP).
Col tempo però, soprattutto dopo la scuola, il suo ruolo nella mia vita è andato via via affievolendosi. Ho iniziato a rendermi conto che molti degli script che scrivevo in Python potevano essere risolti in modo più diretto con una manciata di comandi Shell.
Oggi, complice un momento di decluttering digitale e un pizzico di nostalgia per i miei primi anni da smanettone, ho deciso di fare un po’ d’ordine e condividere qui una lista riassuntiva di vecchi script Python che ho ritrovato sul mio PC.
01. Piccoli progetti da cui inziare (livello base)
All’epoca era passato un bel po’ di tempo dalla fine delle superiori alla creazione del mio primo file .py sul computer. E, dato che la mia memoria funziona a fasi alterne — nel senso che a volte fa schifo e altre fa ancora peggio — avevo deciso di seguire qualche tutorial trovato su Instagram durante il lockdown, convinto che così avrei potuto riprendere un po’ la mano (Potete pure mandarmi a cagare per questa stronzata, lo accetto).
Questi sono alcuni degli script che avevo provato a scrivere in quel periodo.
⏰ 1. Sveglia in Python (Alarm Clock)
Un esempio semplice ma funzionale. Il programma chiede l’orario della sveglia e la confronta ogni secondo con l’orario attuale. Quando coincidono, suona.
from datetime import datetime
from playsound import playsound
alarm_time = input("Enter the time of alarm to be set:HH:MM:SS\n")
alarm_hour = alarm_time[0:2]
alarm_minute = alarm_time[3:5]
alarm_seconds = alarm_time[6:8]
alarm_period = alarm_time[9:11].upper()
print("Setting up alarm...")
while True:
    now = datetime.now()
    current_hour = now.strftime("%I")
    current_minute = now.strftime("%M")
    current_seconds = now.strftime("%S")
    current_period = now.strftime("%p")
    if(alarm_period == current_period):
        if(alarm_hour == current_hour):
            if(alarm_minute == current_minute):
                if(alarm_seconds == current_seconds):
                    print("Wake Up!")
                    playsound('audio.mp3')
                    break
🔍 2. Binary Search
Un classico esempio di algoritmo di ricerca. L’utente inserisce un numero e il programma cerca quel valore all’interno di una lista ordinata.
lst = [1,2,3,4,5,6,7,8,9,10]
lst.sort()
first = 0
last = len(lst) - 1
mid = (first + last) // 2
item = int(input("enter the number to be search: "))
found = False
while(first <= last and not found):
    mid = (first + last) // 2
    if lst[mid] == item:
        print("found at location {mid}")
    else:
        if item < lst[mid]:
            last = mid - 1
        else:
            first = mid + 1
if found = False:
    print("Number not found")
🎲 3. Simulatore di Dadi
Un programma minimalista che simula il lancio di un dado.
import random
while True:
    print(''' 1. roll the dice         2.exit''')
    user = int(input("What you want to do\n"))
    if user == 1:
        number = random.randint(1,6)
        print(number)
    else:
        break
🔢 4. Indovina il numero
Il computer genera un numero tra 1 e 10. Hai 3 tentativi per indovinarlo
import random
number = random.randint(1,10)
for i in range(0,3):
    user = int(input("guess the number"))
    if user == number:
        print("Hurray!!\nyou guesed the number right it's {number}")
        break
if user != number:
    print("Your guess is incorrect the number is {number}")
🔐 5. Generatore di Password
Crea una password casuale di lunghezza a scelta, combinando lettere, numeri e simboli.
import random
passlen = int(input("enter the length of password: "))
s = "abcdefghijklmnopqrstuvwxyz01234567890ABCDEFGHIJKLMNOPQRSTUVWXYZ!@#$%^&()?"
p = "".join(random.sample(s,passlen))
print(p)
📅 6. Visualizza un calendario mensile
Questo piccolo script ti permette di generare e stampare a schermo il calendario di un mese specifico, semplicemente inserendo anno e mese da tastiera.
import calendar

yy = int(input("Insert year: "))  # year
mm = int(input("Insert month: "))  # month
print(calendar.month(yy, mm))  # display the calendar
✊✋✌️ 7. Sasso, Carta, Forbici
Un grande classico trasformato in uno script Python interattivo. L’utente gioca contro il computer, che sceglie casualmente tra “sasso”, “carta” e “forbici”.
import random

game_list = ['Sasso','Carta','Forbice']
computer = c = 0
command = p = 0
print("Score: Computer" + str(c) + " Player " + str(p))

#the loop
run = True
while run:
    computer_choice = random.choice(game_list)
    command = input("Sasso, Carta, Forbice o Esci: ")
    if command == computer_choice:
        print("Tie")
    elif command == "Sasso":
        if computer_choice == "Forbice":
            print("Ha vinto il player!")
            p += 1
        else:
            print("Ha vinto il computer!")
            c += 1
    elif command == "Carta":
        if computer_choice == "Sasso":
            print("Ha vinto il player!")
            p += 1
        else:
            print("Ha vinto il computer!")
            c += 1
    elif command == "Forbice":
        if computer_choice == "Carta":
            print("Ha vinto il player!")
            p += 1
        else:
            print("Ha vinto il computer!")
            c += 1
    elif command == "Esci":
        break
    else:
        print("Comand sbagliato!")
    print("Player: " + command)
    print("Computer: " + computer_choice)
    print("")
    print("Score: Computer " + str(c) + " Player " + str(p))
    print("")
02. Altri progetti (livello intermedio)
Finito di scrivere i primi sei script, come si può intuire, mi sono ritrovato a chiedermi se tutto questo avesse davvero senso (spoiler: sni).
Ma, visto che ero già in ballo — e tanto in quel periodo non è che ci fosse molto altro da fare — ho deciso di continuare.
Parliamo dell’autunno-inverno 2020: pieno lockdown, giornate tutte uguali, e la voglia di mettermi alla prova con qualcosa che, almeno sulla carta, doveva essere un po’ più complesso.
📸 1. Downloader di immagini profilo Instagram (con GUI)
Un’app semplice ma d’effetto: digiti il nome utente Instagram e clicchi su “Download” — il programma scarica automaticamente la foto profilo del profilo indicato.
import instaloader
from PIL import ImageTk, Image
import tkinter as tk
from tkinter import messagebox

win = tk.Tk()
win.title('Instagram Image Downloader')

def imgDownload():
    ig = instaloader.Instaloader()
    profile = entry.get()
    ig.download_profile(profile, profile_pic_only = True)
    messagebox.showinfo("Status","Image Downloaded Successfully")


img = Image.open("ig.png")
img = img.resize((200, 200), Image.ANTIALIAS)
resized_img = ImageTk.PhotoImage(img)

title = tk.Label(win, text="Instagram Image Downloader",font=("Times",20,"bold"))
title.grid(row=0,column=0,columnspan=5,padx=30,pady=10)

image = tk.Label(win,image=resized_img)
image.grid(row=2,column=0,columnspan=5,pady=20)

label1 = tk.Label(win,text="Enter Username: ",font=("Arial",10))
label1.grid(row=3,column=0)

entry = tk.Entry(win,width=40)
entry.grid(row=3,column=1,columnspan=3)

btn = tk.Button(win,text="Download",command=imgDownload)
btn.grid(row=4,column=0,columnspan=5,pady=10)

win.mainloop()
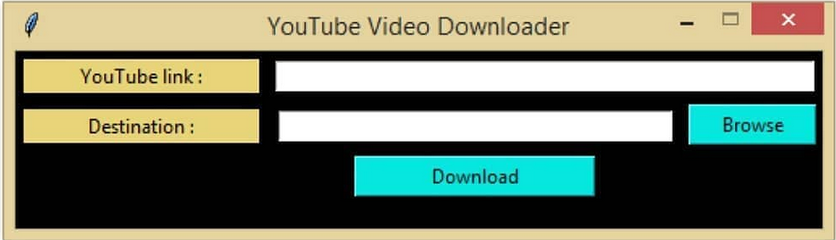
📥 2. Downloader di video YouTube con Python
Uno script semplice per scaricare video da YouTube direttamente tramite terminale. Inserisci il link del video e lui fa il resto.
from tkinter import *
import pathlib
from pytube import YouTube
# pip install pytube3
from tkinter import messagebox, filedialog

def Widgets():
    link_label = Label(root,text="YouTube link :",bg="#E8D579",width=20)
    link_label.grid(row=1,colum=0,pady=5,padx=5)

    linkText = Entry(root,width=55,textVariable = video_Link)
    linkText.grid(row=1,colum=1,pady=5,padx=5,columnspan=2)

    destination_label = Label(root,text="Destination :",bg="#E8D579",width=20)
    destination_label.grid(row=2,column=0,pady=5,padx=5)

    browse_B = Button(root,text="Browse",command=Browse,width=10,bg="#05E8E0")
    browse_B.grid(row=2,column=2,pady=1,padx=1)

    Download_B = Button(root,text="Download",command=Download,width=20,bg="#05E8E0")
    Download_B.grid(row=3,column=1,pady=3,padx=3)

# destination folder to save the video
def Browse():
    download_Directory = filedialog.askdirector(initialdir=pathlib.Path.cwd())
    # Displaying the directory in the directory
    #textbox
    download_Path.set(download_Directory)

def Download():
    #getting user-input Youtube Link
    YouTube_link = video_Link.get()
    download_Folder = download_Path.get()
    # Creating objext of YouTube()
    getVideo = YouTube(YouTUbe_link)
    # Getting alla the available streams of the youtube video and selecting the first
    videoStream = getVideo.streams.first()
    # Downloading the video to destination
    videoStream.downloas(download_Folder)
    # Displaying the message
    messagebox.showinfo("SUCCESSFULLY","DOWNLOADED AND SAVED IN\n" + download_Folder)


root = Tk()
root.geometry("400x110")
root.resizable(0,0)
root.title("YouTube Video Downloader")
root.config(background = "#000000")
# Creating the tkinter Variables
video_Link = StringVar()
download_Path = StringVar()
# Calling the Widgets() function
Widgets()
root.mainloop()
Ecco… questo forse è uno degli script di cui vado più fiero e che, effettivamente, mi è tornato utile.
🎧 3. Dividere file audio con Python
Hai un file audio troppo lungo e vuoi tagliarlo in parti più piccole? Con pydub bastano poche righe di codice per farlo.
from pydub import AudioSegment
from pydub.utils import make_chunks

my_audio = AudioSegment.from_file("audio.wav", "wav")
chunk_length_ms = 780000  # pydub calculates in millisecond
chunks = make_chunks(my_audio, chunk_length_ms)   # Make chunks of one sec
for i, chunk in enumerate(chunks):
    chunk_name = "audio_split_{0}.wav".format(i)
    print("exporting", chunk_name)
    chunk.export(chunk_name, format="wav")
🎵 4. Music Player con interfaccia grafica
Un piccolo lettore musicale fatto in casa. Può riprodurre file .mp3, ha un’interfaccia semplice e serve a prendere confidenza con pygame.mixer e tkinter.
import pygame
from pygame import mixer
from tkinter import *
import os

def playsong():
    currentsong=playlist.get(ACTIVE)
    print(currentsong)
    mixer.music.load(currentsong)
    songstatus.set("Playing")
    mixer.music.play()

def pausesong():
    songstatus.set("Paused")
    mixer.music.pause()

def stopsong():
    songstatus.set("Stopped")
    mixer.music.stop()

def resumesong():
    songstatus.set("Resuming")
    mixer.music.unpause()

root=Tk()
root.title('ProjectGurukul Music player project')

mixer.init()
songstatus=StringVar()
songstatus.set("choosing")

#playlist---------------

playlist=Listbox(root,selectmode=SINGLE,bg="DodgerBlue2",fg="white",font=('arial',15),width=40)
playlist.grid(columnspan=5)

os.chdir(r'C:\Users\BOSS\Desktop\MyPlaylist')
songs=os.listdir()
for s in songs:
    playlist.insert(END,s)

playbtn=Button(root,text="play",command=playsong)
playbtn.config(font=('arial',20),bg="DodgerBlue2",fg="white",padx=7,pady=7)
playbtn.grid(row=1,column=0)

pausebtn=Button(root,text="Pause",command=pausesong)
pausebtn.config(font=('arial',20),bg="DodgerBlue2",fg="white",padx=7,pady=7)
pausebtn.grid(row=1,column=1)

stopbtn=Button(root,text="Stop",command=stopsong)
stopbtn.config(font=('arial',20),bg="DodgerBlue2",fg="white",padx=7,pady=7)
stopbtn.grid(row=1,column=2)

Resumebtn=Button(root,text="Resume",command=resumesong)
Resumebtn.config(font=('arial',20),bg="DodgerBlue2",fg="white",padx=7,pady=7)
Resumebtn.grid(row=1,column=3)

mainloop()
🖼️ 5. Convertitore da PNG a JPG
Hai una cartella piena di immagini .png e ti serve convertirle in .jpg? Con questo script puoi farlo in pochi secondi, direttamente da terminale.
import tkinter as tk
from tkinter import filedialog
from PIL import image

root = tk.Tk()

canvas1 = tk.Canvas(root,width=300,height=250,bg='azure3',relief='raised')
canvas1.pack()

label1 = tk.Label(root,text='File Conversion Tool',bg='azure3')
label1.config(font=('helvetica',20))
canvas1.create_windows(150,60,window=label1)

def getPNG():
  global im1

  import_file_path = filedialog.askopenfilename()
  im1 = Image.open(import_file_path)

browseButton_PNG = tk.Button(text="   IMPORT PNG FILE     ",command=getPNG,bg='royalblue',fg='white',font=('helvetica',12,'bold'))
camvas1.create_window(150,130,window=browseButton_PNG)


def convertToJPG():
  global im1
  export_file_path = filedialog.asksaveasfilename(defaultextension='.jpg')
  im1.save(export_file_path)


saveAsButton_JPG = tk.Button(text='Convert PNG to JPG',command=convertToJPG,bg='royalblue',fg='white',font=('helvetica',12,'bold'))
canvas1.create_windows(150,180,window=saveAsButton_JPG)

root.mainloop()
📝 6. Notepad in Python (con GUI)
Un progetto più strutturato, con una GUI realizzata interamente in tkinter. È un editor di testo basilare — supporta apertura, salvataggio, modifica di file .txt, ed è un ottimo esercizio per imparare a gestire finestre, menu e interazioni utente.
import tkinter
import os
from tkinter import *
from tkinter.messagebox import *
from tkinter.filedialog import *

class Notepad:
	__root = Tk()
	__thisWidth = 300
	__thisHeight = 300
	__thisTextArea = Text(__root)
	__thisMenuBar = Menu(__root)
	__thisFileMenu = Menu(__thisMenuBar, tearoff=0)
	__thisEditMenu = Menu(__thisMenuBar, tearoff=0)
	__thisHelpMenu = Menu(__thisMenuBar, tearoff=0)
	__thisScrollBar = Scrollbar(__thisTextArea)
	__file = None

	def __init__(self,**kwargs):
		try:
                    self.__root.wm_iconbitmap("Notepad.ico")
		except:
                    pass
		try:
        	    self.__thisWidth = kwargs['width']
		except KeyError:
		    pass
		try:
                    self.__thisHeight = kwargs['height']
		except KeyError:
                    pass
		# Set the window text
		self.__root.title("Untitled - Notepad")
		# Center the window
		screenWidth = self.__root.winfo_screenwidth()
		screenHeight = self.__root.winfo_screenheight()
		# For left-alling
		left = (screenWidth / 2) - (self.__thisWidth / 2)
		# For right-allign
		top = (screenHeight / 2) - (self.__thisHeight /2)
		# For top and bottom
		self.__root.geometry('%dx%d+%d+%d' % (self.__thisWidth,left, top))

		# To make the textarea auto resizable
		self.__root.grid_rowconfigure(0, weight=1)
		self.__root.grid_columnconfigure(0, weight=1)

		# Add controls (widget)
		self.__thisTextArea.grid(sticky = N + E + S + W)

		# To open new file
		self.__thisFileMenu.add_command(label="New",command=self.__newFile)

		# To open a already existing file
		self.__thisFileMenu.add_command(label="Open",command=self.__openFile)

		# To save current file
		self.__thisFileMenu.add_command(label="Save",command=self.__saveFile)

		# To create a line in the dialog
		self.__thisFileMenu.add_separator()
		self.__thisFileMenu.add_command(label="Exit",command=self.__quitApplication)
		self.__thisMenuBar.add_cascade(label="File",menu=self.__thisFileMenu)

		# To give a feature of cut
		self.__thisEditMenu.add_command(label="Cut",command=self.__cut)

		# to give a feature of copy
		self.__thisEditMenu.add_command(label="Copy",command=self.__copy)

		# To give a feature of paste
		self.__thisEditMenu.add_command(label="Paste",command=self.__paste)

		# To give a feature of editing
		self.__thisMenuBar.add_cascade(label="Edit",menu=self.__thisEditMenu)

		# To create a feature of description of the notepad
		self.__thisHelpMenu.add_command(label="About Notepad",command=self.__showAbout)
		self.__thisMenuBar.add_cascade(label="Help",menu=self.__thisHelpMenu)
		self.__root.config(menu=self.__thisMenuBar)
		self.__thisScrollBar.pack(side=RIGHT,fill=Y)

		# Scrollbar will adjust automatically according to the content
		self.__thisScrollBar.config(command=self.__thisTextArea.yview)
		self.__thisTextArea.config(yscrollcommand=self.__thisScrollBar.set)


	def __quitApplication(self):
		self.__root.destroy()
		# exit()

	def __showAbout(self):
		showinfo("Notepad","Mrinal Verma")

	def __openFile(self):

		self.__file = askopenfilename(defaultextension=".txt",filetypes=[("All Files","*.*"),("Text Documents","*.txt")])

		if self.__file == "":

			# no file to open
			self.__file = None
		else:

			# Try to open the file
			# set the window title
			self.__root.title(os.path.basename(self.__file) + " - Notepad")
			self.__thisTextArea.delete(1.0,END)

			file = open(self.__file,"r")

			self.__thisTextArea.insert(1.0,file.read())

			file.close()


	def __newFile(self):
		self.__root.title("Untitled - Notepad")
		self.__file = None
		self.__thisTextArea.delete(1.0,END)

	def __saveFile(self):

		if self.__file == None:
			# Save as new file
			self.__file = asksaveasfilename(initialfile='Untitled.txt',defaultextension=".txt",filetypes=[("All Files","*.*"),("Text Documents","*.txt")])

			if self.__file == "":
				self.__file = None
			else:

				# Try to save the file
				file = open(self.__file,"w")
				file.write(self.__thisTextArea.get(1.0,END))
				file.close()

				# Change the window title
				self.__root.title(os.path.basename(self.__file) + " - Notepad")


		else:
			file = open(self.__file,"w")
			file.write(self.__thisTextArea.get(1.0,END))
			file.close()

	def __cut(self):
		self.__thisTextArea.event_generate("<<Cut>>")

	def __copy(self):
		self.__thisTextArea.event_generate("<<Copy>>")

	def __paste(self):
		self.__thisTextArea.event_generate("<<Paste>>")

	def run(self):

		# Run main application
		self.__root.mainloop()

# Run main application
notepad = Notepad(width=600,height=400)
notepad.run()
🗣️ 6. Text to Speech
Un semplice Text to Speech in Python
# Import the required module for text
# to speech conversion
from gtts import gTTS

# This module is imported so that we can
# play the converted audio
import os

# The text that you want to convert to audio
mytext = 'Welcome to geeksforgeeks!'

# Language in which you want to convert
language = 'en'

# Passing the text and language to the engine,
# here we have marked slow=False. Which tells
# the module that the converted audio should
# have a high speed
myobj = gTTS(text=mytext, lang=language, slow=False)

# Saving the converted audio in a mp3 file named
# welcome
myobj.save("welcome.mp3")

# Playing the converted file
os.system("mpg321 welcome.mp3")
⚽ Creare un campo da calcio in Python
Preso spunto da quest’articolo che ho trovato interessante.
🕹️ Flappy Bird
Per questo ho seguito questo tutorial trovato su Youtube una sera.
Un fatto divertente su questo progetto è che, finito il gioco, ho provato a creare la versione .exe del file Python, fallendo miseramente.
🌐 Django
Avrei voluto scrivere tante cose a riguardo, ma voglio riassumere tutto con una domanda: “Ma perche?”
Faccio veramente fatica a comprendere e capire che posso usare python per lo sviluppo web, è una cosa che non ha senso.
Ho provato a fare una semplice landing, ma ho fatto una fatica a comprendere dove modificare e scrivere i componenti che ad un certo punto mi sono stufato ed ho mollato.
comprendo molto di più quelli che usano framework di Javascript che Django. Per me non ha un minimo di senso.
3. Progetti utili
Arriviamo ora alla parte più importante di questa pagina, ovvero quando Pyhton mi è effettivamente tornato utile.
Perchè sì, sovente Python l’ho usato per robe vagamente futili, ci sono stati 4 progetti che, alla fine dei conti, mi sono tornati utili
Il primo, che si può trovare qua, è un script che, modificando il file host, mi bloccava degli url.
Il secondo, disponibile invece qua, è stato uno dei primi esperimenti che facevo con l’AI.
Il terzo è stato un timer personalizzato creato per allenarmi a casa durante il secondo lockdown. Il timer è stato creato per rimettermi in forma e, tra tutti quelli inseriti in quest’articolo, penso che sia il progetto a cui tengo di più, dato che è stato scritto non per sfizio ma per rispondere effettivamente ad una mia esigenza.
Il timer si basa su quest’immagine:
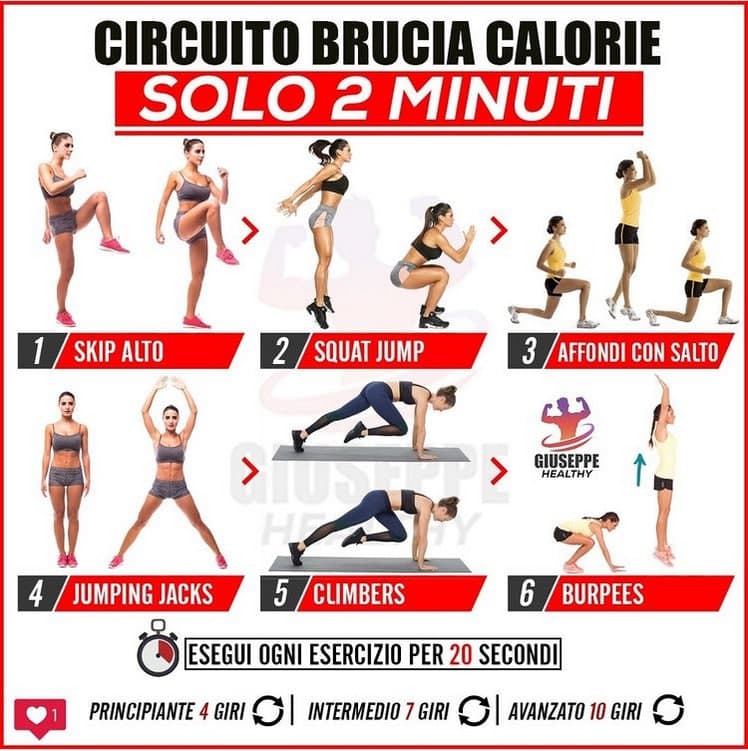
e come audio, avevo tre miei vocali dove dicevo “Inzio”, “Pausa” e “Circuito finito”.
from PIL import ImageTk, Image
from tkinter import Label
from playsound import playsound
import tkinter as tk
import time

win = tk.Tk()
win.title('Circuito Brucia Calorie | Allenamento')
win.geometry("550x650")


def timerAllenati():
    timer = 20
    while timer:
        time.sleep(1)
        timer -= 1
    playsound("src/audio/Pause.mp3")


def pausa():
    timer = 10
    while timer:
        time.sleep(1)
        timer -= 1
    playsound("src/audio/Start.mp3")


def allenamentoCalorie():
    i = 0
    pausa()
    while i < 24:
        timerAllenati()
        pausa()
        i = i + 1
    playsound("src/audio/Finish.mp3")


# Main
title = Label(win, text="Circuito Brucia Calorie | Allenamento", font=("Times", 20, "bold"))
title.grid(row=1, column=2, columnspan=5, padx=30, pady=10)
img = Image.open("src/img/img.jpg")
img = img.resize((500, 500), Image.ANTIALIAS)
resized_img = ImageTk.PhotoImage(img)

image = tk.Label(win, image=resized_img)
image.grid(row=2, column=0, columnspan=5, pady=20)
btn = tk.Button(win, text="Allenati", command=allenamentoCalorie)
btn.grid(row=4, column=0, columnspan=5, pady=10)

win.mainloop()
Il quarto, infine, è stato uno script creato grazie all’IA qualche mese fa perchè dovevo cambiare velocemente i nomi di alcuni commit git.
Subito dopo averlo usato ho voluto fare alcune prove e mi sono reso conto che in shell ci mettevo tempo e righe in meno, ma a quel punto ho fatto spallucce e me ne sono sbattuto, tanto quello che dovevo fare l’avevo fatto.
import os
import subprocess

# === CONFIGURAZIONE ===
repo_path = ""  # <- Cambia con il percorso del tuo repository
nuovo_nome = ""
nuova_email = ""

# === FUNZIONE PRINCIPALE ===
def riscrivi_autori(repo_path, nuovo_nome, nuova_email):
    os.chdir(repo_path)

    print("🔍 Avvio riscrittura dei commit...")

    comando = f'''
    git filter-branch --env-filter '
    OLD_NAME=$(git config user.name)
    OLD_EMAIL=$(git config user.email)

    if [ "$GIT_COMMITTER_NAME" != "{nuovo_nome}" ] || [ "$GIT_COMMITTER_EMAIL" != "{nuova_email}" ]; then
        export GIT_COMMITTER_NAME="{nuovo_nome}"
        export GIT_COMMITTER_EMAIL="{nuova_email}"
    fi
    if [ "$GIT_AUTHOR_NAME" != "{nuovo_nome}" ] || [ "$GIT_AUTHOR_EMAIL" != "{nuova_email}" ]; then
        export GIT_AUTHOR_NAME="{nuovo_nome}"
        export GIT_AUTHOR_EMAIL="{nuova_email}"
    fi
    ' --tag-name-filter cat -- --all
    '''

    # Esegui il comando
    subprocess.run(comando, shell=True, check=True)

    print("✅ Commit riscritti con autore aggiornato.")

    # Push forzato
    print("🚀 Eseguo push --force su tutti i branch...")
    subprocess.run("git push --force --tags", shell=True, check=True)

    print("🎉 Operazione completata con successo!")

# === ESECUZIONE ===
riscrivi_autori(repo_path, nuovo_nome, nuova_email)